Friday, September 29, 2023

How to create MySQL replication server

 10.20.6.29 – Master Database

10.20.6.30 – Slave Database

pico /etc/mysql/mysql.conf.d/mysqld.cnf

chnage the bind address to your server real ip address 10.20.6.29

bind-address            = 127.0.0.1

uncomment

1Code language: JavaScript (javascript)

at the bottom of the file add your databases

binlog_do_db            = newdatabase
binlog_do_db            = newdatabase2
sudo service mysql restart

now log in with root on the mysql server via terminal

'slave_user'Code language: JavaScript (javascript)

copy the databases to the slave server with phpmyadmin
in 10.20.6.30 a.k. the slave

pico /etc/mysql/mysql.conf.d/mysqld.cnf
2Code language: JavaScript (javascript)
'10.20.6.29'Code language: JavaScript (javascript)
START SLAVE;
SHOW SLAVE STATUS\G

If there is an issue in connecting, you can try starting slave with a command to skip over it:

GLOBAL

unlockR – Stupid Simple App to Remove PDF Password in Linux & Windows

 For those want to unlock / decrypt PDF files, there’s now a stupid simple graphical tool to do the job in Linux.

It’s easy to encrypt you PDF files in Ubuntu Linux since the built-in LibreOffice office suite has the option on ‘Export as PDF’ dialog. However, there seems no easy way to remove password for PDF file, other than using qpdf command:

qpdf --decrypt --password=<PASSWORD> input.pdf output.pdf
Code language: HTML, XML (xml)

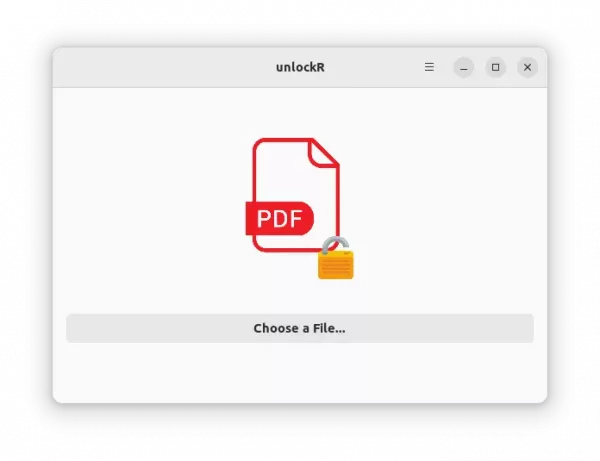
unlockR is a new GTK4 application that use Libadwaita to provide a modern simple user interface to decrypt your PDF files.

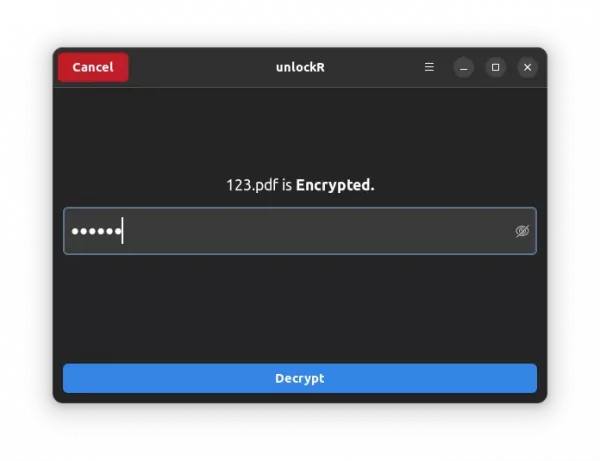
It’s so simple that you just need to click ‘Open a File‘ to select your PDF, then type the password, and finally hit ‘Decrypt’. It doesn’t change the original file, but generates a new PDF without password protect.

As the picture shows, it has both light and dark mode that switches automatically according your system color scheme.

NOTE: This app is NOT about to crack password on a PDF file. You need the password to be able to decrypt it.

How to Install unlockR

It is a free open-software software works on both Linux and Windows. For Windows package, just grab the zip from github releases page:

unlockR releases

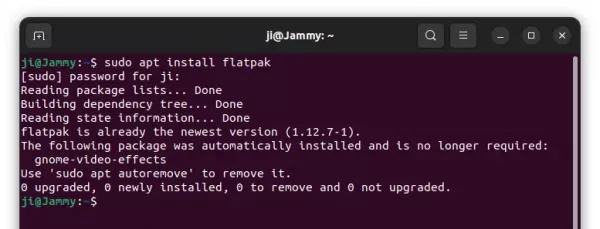
For Linux, it offers the binary package via universal Flatpak. Ubuntu user need to first press Ctrl+Alt+T on keyboard to open terminal, and run command to install the Flatpak daemon:

sudo apt install flatpak

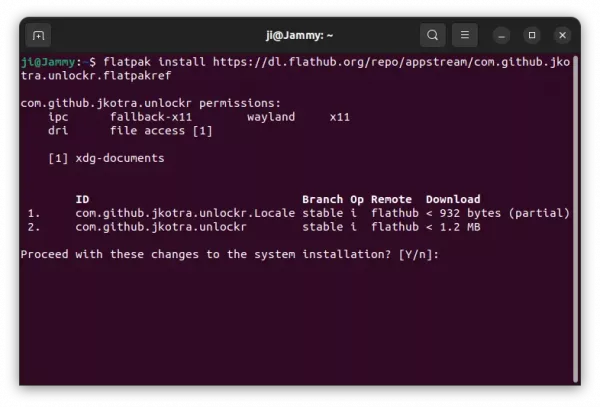
Next, install the app package via command:

flatpak install https://dl.flathub.org/repo/appstream/com.github.jkotra.unlockr.flatpakref
Code language: JavaScript (javascript)

Like normal applications, search for and open it from ‘Activities’ overview (or start menu) after installation.

Uninstall:

To remove the Flatpak package, open terminal and run command:

flatpak uninstall --delete-data com.github.jkotra.unlockr
Code language: CSS (css)

You may also clear useless runtime libraries via flatpak uninstall --unused.

How to Permanently Disable Microsoft Defender Antivirus on Windows 11 and 10


How to Permanently Disable Microsoft Defender Antivirus on Windows 11 and 10

Microsoft Defender is the built-in antivirus program on Windows 10/11 and Windows Server that is enabled and configured by default. In this article, we’ll look at how to turn off Microsoft Defender on Windows 11 completely or suspend it.

When you install a third-party antivirus in Windows 10 or 11, the built-in Microsoft Defender Antivirus is automatically disabled. In some cases, it doesn’t happen and you may need to disable Microsoft Defender manually.

Turn off Defender Antivirus Protection on Windows 11 and 10

In some cases, you may need to suspend Microsoft Defender Antivirus protection without affecting important system services. For example, when Microsoft Defender prevents a system program or tool from running or installing. To run such an app, you have to stop Windows Defender Real-time Protection.

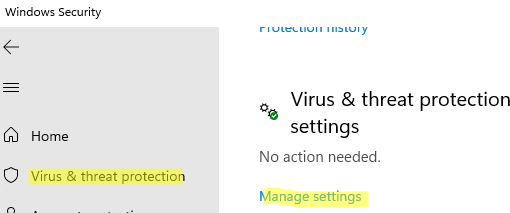
  1. Open Settings -> Privacy and Security -> Windows Security  (or run a quick access URI commandms-settings:windowsdefender ) in Windows 11;
    If the Microsoft Defender Security app doesn’t open or shows a blank screen, you can fix it by reinstalling Microsoft.SecHealthUI UWP app.
  2. Open Virus and threat protection and click Manage SettingsVirus and threat protection on Windows 11
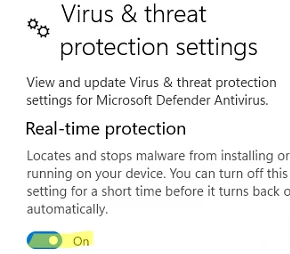
  3. Move the Real-time protection toggle to OffDisable Real-time protection in Microsoft Defender
  4. Confirm that you want to stop antivirus protection in the UAC prompt.

To resume Windows Defender protection, move the toggle to On. Also, Microsoft Defender Real-time Protection is enabled automatically after you restart the computer.

You can use the following PowerShell command to disable real-time protection (see how to manage Windows Defender settings using PowerShell):

Set-MpPreference -DisableRealtimeMonitoring $true

However, this command doesn’t work as expected in Windows 11 and the latest Windows 10 builds. The matter is that in Windows 10 1903 or later, a new Microsoft Defender feature is enabled by default: Microsoft Defender Tamper Protection.

Tamper protection provides additional protection for core Microsoft Defender security features. In particular, it prevents unauthorized changes of antivirus settings, suspension of real-time protection, and disabling of cloud protection. If the Tamper Protection is enabled, you won’t be able to disable Real-Time Protection in Microsoft Defender using PowerShell.

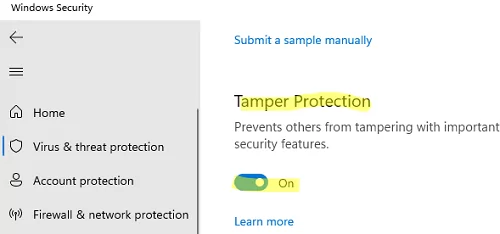
You can only disable Tamper Protection manually from Windows Security GUI. Navigate to Virus and threat protection section, scroll down and switch the Tamper Protection toggle to Off.

Protect Microsoft Defender security settings with tamper protection

After disabling Tamper Protection, you will be able to disable Microsoft Defender Real-time Protection using the PowerShell command shown above.

How to Disable Microsoft Defender Antivirus in Windows 11 Permanently?

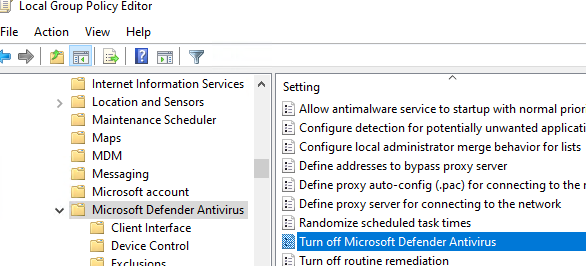
In earlier Windows 10 builds and in Windows Server 2016, you could completely disable Windows Defender using the Turn off Windows Defender Antivirus GPO option located in Computer Configurations -> Administrative Template -> Windows Component -> Windows Defender Antivirus section of the Local Group Policy Editor (gpedit.msc) or using the DisableAntiSpyware registry parameter under HKEY_LOCAL_MACHINE\SOFTWARE\Policies\Microsoft\Windows Defender:

New-ItemProperty -Path “HKLM:\SOFTWARE\Policies\Microsoft\Windows Defender” -Name DisableAntiSpyware -Value 1 -PropertyType DWORD -Force

Turn off Windows Defender Antivirus using GPO

Also, you can disable Real-Time Protection using the GPO option Turn on behavior monitoring or with the registry parameter DisableBehaviorMonitoring =1.

Starting from Windows 10 1903 release, you cannot use these GPO options or registry parameters to disable Microsoft Defender, because these settings are shielded by Tamper Protection. The methods previously used to disable Microsoft Defender Antivirus don’t work on Windows 11.

To completely disable Windows Defender Antivirus on Windows 11, you need to boot your computer to Safe Mode.

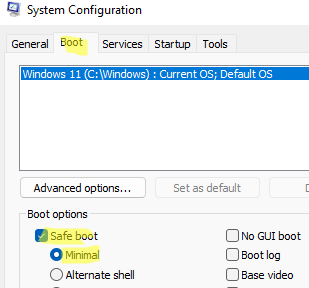
  1. Run msconfig;
  2. Go to the Boot tab;
  3. Select Safe boot -> Minimal in the boot options section;
  4. Click OK and restart your computer. msconfig - enable safe boot
  5. Your computer will boot into Safe Mode;
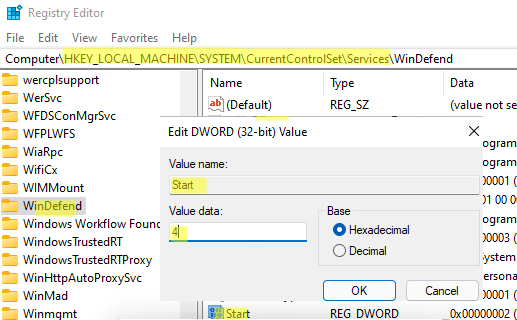
  6. Then open the Registry Editor (regedit.exe), go to the reg key HKEY_LOCAL_MACHINE\SYSTEM\CurrentControlSet\Services and disable the startup of the following services:
    • Sense
    • WdBoot
    • WdFilter
    • WdNisDrv
    • WdNisSvc
    • WinDefend

    To do it, change the Start parameter value to 4. disable windefend service via registry

    Change the Start value for all services specified above manually or using the following PowerShell script:
    $regpath='HKLM:\SYSTEM\CurrentControlSet\Services'
    Set-ItemProperty -Path ($regpath+"\WinDefend") -Name Start -Value 4
    Set-ItemProperty -Path ($regpath+"\Sense") -Name Start -Value 4
    Set-ItemProperty -Path ($regpath+"\WdFilter") -Name Start -Value 4
    Set-ItemProperty -Path ($regpath+"\WdNisDrv") -Name Start -Value 4
    Set-ItemProperty -Path ($regpath+"\WdNisSvc”) -Name Start -Value 4
    Set-ItemProperty -Path ($regpath+"\WdBoot") -Name Start -Value 4

    To re-enable Microsoft Defender in Windows, set the following default values of the Start registry entry for services:

    • Sense — 3
    • WdBoot — 0
    • WdFilter — 0
    • WdNisDrv — 3
    • WdNisSvc — 3
    • WinDefend — 2
  7. Run msconfig and disable the Safe Mode. Then restart your computer and boot as usual;
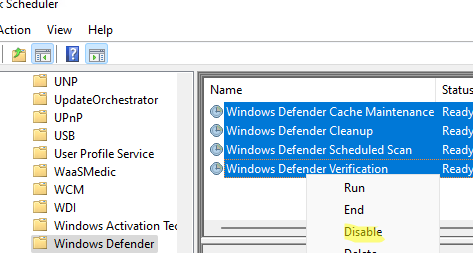
  8. Disable the following four tasks in Task Scheduler (taskschd.msc): Microsoft –> Windows –> Windows Defender. Disable Windows Defender tasks in Task Scheduler
    Get-ScheduledTask “Windows Defender Cache Maintenance” | Disable-ScheduledTask
    Get-ScheduledTask “Windows Defender Cleanup” | Disable-ScheduledTask
    Get-ScheduledTask “Windows Defender Scheduled Scan” | Disable-ScheduledTask
    Get-ScheduledTask “Windows Defender Verification” | Disable-ScheduledTask

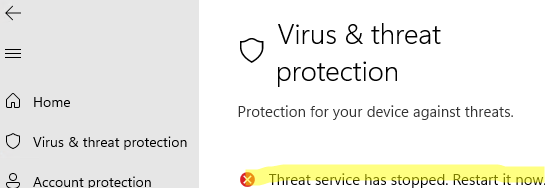
Run the Windows Security app and make sure that Microsoft Defender Antivirus is now disabled. You should see the message: Threat service has stopped. Restart it now. Microsoft Defender - Threat service has stopped. Restart it now

So we have looked at how to disable Microsoft Defender Antivirus on Windows 10 and 11.


Recovering Files from BitLocker Encrypted Drive


Recovering Files from BitLocker Encrypted Drive

BitLocker Drive Encryption technology helps protect data on your local and external drives by encrypting the contents of logical volumes. In this article, we’ll have a look at two ways to extract data from a BitLocker-encrypted partition. The first involves decrypting the BitLocker-protected partition using the standard Windows tools. The second way suggests that the file system of the encrypted drive is corrupted (the area of the drive where BitLocker stores its metadata is damaged) or that Windows won’t boot.

Requirements for data recovery from a BitLocker volume

In order to recover data from a drive that is encrypted with BitLocker, you would need to have at least one of the BitLocker protection elements:

  • BitLocker password (the one that you enter in the Windows GUI to unlock the encrypted drive);
  • The BitLocker Recovery key;
  • System startup key (.bek) – a key file on a USB flash drive that allows you to automatically decrypt the boot partition without requiring the user to enter a password.

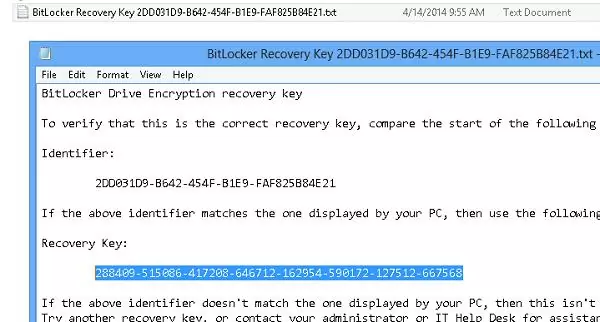
The BitLocker recovery key is a unique sequence of 48 characters. The recovery key is generated before Bitlocker starts the partition encrypton. You can print the recovery key, save it as a text file on external media, or save it to your Microsoft account.
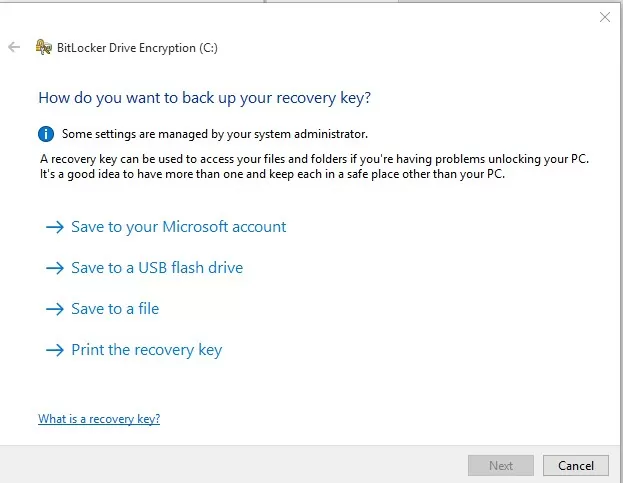
backup bitlocker recovery key in windows 10

BitLockerRecoveryKey text file

You can find the Bitlocker recovery key in your account on the Microsoft website https://onedrive.live.com/recoverykey.
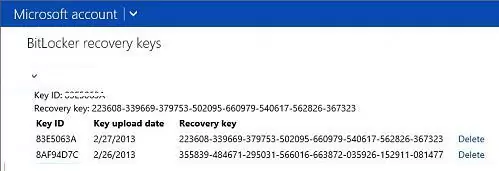
BitLocker Recovery Keys in microsoft website

For computers that are joined to an Active Directory domain, an administrator can configure GPOs to automatically save BitLocker recovery keys in the computer’s account attribute in AD.

If you do not have a recovery key, you will not be able to access your data.

How to Unlock a BitLocker Encrypted Drive in Windows?

The easiest way to unlock a BitLocker-encrypted drive is from the Windows GUI.

Connect the drive to your computer and go to the Control Panel -> System and Security -> BitLocker Drive Encryption (available in Professional and Enterprise Windows editions). Select the BitLocker-encrypted disc and click Unlock Drive.
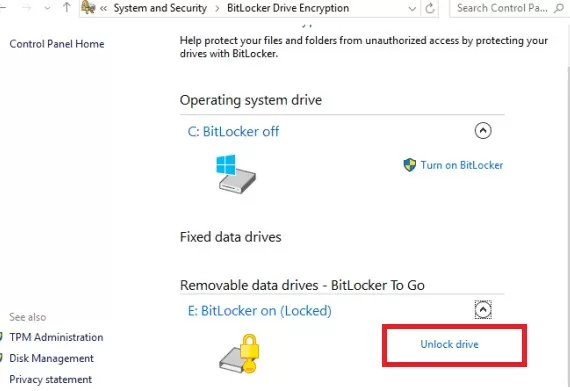
windows 10 bitlocker unlock the protected drive

It is not possible to encrypt or decrypt a BitLocker volume on a computer that is running Windows Home Edition.

Depending on the security method, specify the password, PIN, or connect the smart card to unlock the drive. If you don’t know the password, you can use the recovery key to decrypt the volume. Select Advanced settings -> Enter recovery key.
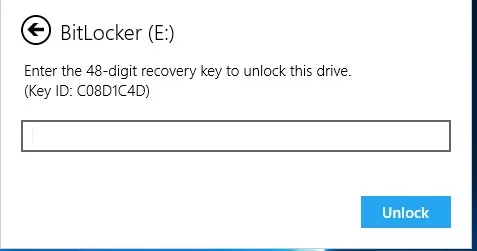
bitlocker enter 48 digit recovery key

If you have more than one recovery key, you can identify the one you need by the Key ID part displayed in the prompt window. If you have entered the correct key, the drive will be unlocked and you will be able to access files on the BitLocker drive.

You can also use PowerShell to disable BitLocker protection for a specific volume:

Disable-BitLocker -MountPoint "C:"

Wait for partition decryption to be complete. Check that the drive has been decrypted:

Get-BitlockerVolume -MountPoint "C:"

VolumeStatus: FullyDecrypted

Get-BitlockerVolume status using PowerShell

Disable BitLocker Encryption for System Drive in Windows Recovery Environment

If your system drive is encrypted by BitLocker and Windows no longer boots (due to incorrect updates, Blue screen of death, freezes on startup, etc.), you can use Windows Recovery Environment (Windows RE) to decrypt the drive.

The WinRE recovery environment should start automatically if Windows fails to boot 3 times in a row. You can also boot your computer from any Windows installation USB flash drive, MS DaRT recovery image, or other LiveCD. If you are using a Windows installation media, press Shift+F10 at the language selection stage (or in WinRE select Troubleshoot -> Advanced options -> Command Prompt).

The WinPE command prompt should appear.

You need to find a Bitlocker encrypted drive letter. To check the status of all available drives in WinPE, run:

manage-bde -status

The result of the command for one (or several) of the drives should contain the following text: “BitLocker Drive Encryption: Volume D”. So you have disk D encrypted.
Unlock the drive by running the command:

manage-bde -unlock D: -pw

The command prompts for a BitLocker password:

Enter the password to unlock this volume:

If the password is correct, a message will appear:

The password successfully unlocked volume D:.<p/re>

bitlocker The password successfully unlocked volume D:.

If you don’t know the BitLocker password, you can use the recovery key to unlock the volume:

manage-bde -unlock D: -RecoveryKey J:\1234567...987ABCDE4564.bek

Your drive is unlocked and you can start repairing the Windows boot loader or fixing other problems.

To unlock the drive and disable BitLocker drive protection altogether, run:

manage-bde -protectors -disable D:

Restart your computer. The drive is now unencrypted.

Using BitLocker Repair Tool (Repair-bde) to Recover Encrypted Drive

To recover data from a damaged/inaccessible BitLocker volume, you must use the Repair-bde (BitLocker Repair Tool) console tool.

Try to decrypt and extract the data to a new drive using the BitLocker password. The repair-bde utility allows you to restore data from a damaged volume to a new partition. Note that the target partition must be larger than the source BitLocker volume and that existing data on the target volume will be deleted (!).

  1. Open the command prompt as an administrator;
  2. Run the following command: repair-bde D: F: -pw –Force, where D: is a disk with the BitLocker data, and E: is an empty drive (partition) to extract the decrypted data to;
  3. Specify the Bitlocker Password (used by the user to unlock the encrypted volume using the Windows GUI).
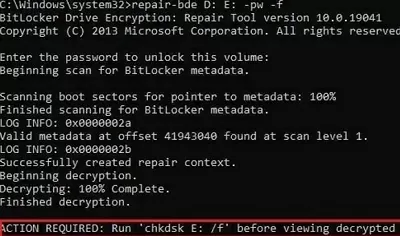
repair bde recover files from damaged bitlocker volume

The repair-bde utility will attempt to recover critical metadata from your encrypted volume and use it for decryption.

If the data has been successfully decrypted, the following message will appear:

Decrypting: 100 completed
Finished decryption.
ACTION REQUIRED: run chkdsk E: /f before viewing decrypted data

You can use the recovery key or the system boot key to decrypt the volume if you don’t know the BitLocker password (if the system partition is encrypted).

Use a Recovery Key to start recovering data from the BitLocker partition:

repair-bde D: E: -rp 288209-513086-417508-646412-162954-590672-167552-664563 –Force
repair-bde scan bitlocker metadata

If BitLocker is used to encrypt the Windows system partition and a special boot key on a USB flash drive is used to boot the operating system, you can decrypt the volume as follows:

repair-bde D: E: -rk I:\2F538474-923D-4330-4549-61C32BA53345.BEK –Force

where 2F538474-923D-4330-4549-61C32BA53345.BEK s the BitLocker drive encryption startup key on the USB flash drive  I: (this file is hidden by default).

After unlocking the volume, you need to check the target drive using the command:

Chkdsk E: /f

Note. If you have failed to recover data from an encrypted drive using the above methods, you should try making a sector-by-sector copy of the damaged partition using the DDRescue Linux tool (or another similar utility for recovering data from damaged partitions). Then try to recover the data from the resultant copy in accordance with the scenario described.


You can also open a BitLocker-encrypted drive from Linux. To do this, you will need the DisLocker tool and a BitLocker recovery password or key.

Use your package manager to install the tool. If you are running Ubuntu/Debian, use the command:

$ sudo apt-get install dislocker

Go into the mnt directory and create two directories (one for the encrypted partition and one for the decrypted one):

$ cd /mnt
$ mkdir encrypted
$ mkdir decrypted

Locate the encrypted partition (fdisk -l command) and decrypt it using the BitLocker password:

$ sudo dislocker -V /dev/sdb1 -u -- /mnt/encrypted

If you have a recovery key, use this command:

$ sudo dislocker -r -V /dev/sdb1 -p your_bitlocker_recovery_key /mnt/encrypted

The DisLocker utility uses the Filesystem in Userspace (FUSE) driver to access an encrypted partition in read-only mode.

The dislocker-file will appear in the target directory. This file contains your NTFS data partition.

To see all the files on the unencrypted partition, you can mount it:

$ sudo mount -o loop /mnt/encrypted/dislocker-file /mnt/decrypted