Friday, November 18, 2016

Howto to enable Mikrotik RouterOS Web Proxy in Transparent Mode

Web proxy is a service that is placed between a client and the internet for HTTP web surfing. It can cache certain contents / http pages in its local cache. Mikrotik have basic PROXY package builtin called WEB PROXY. It is suitable for basic caching for small to mid size networks.
For advance caching capabilities, Use 3rd party external proxy server like SQUID.

MikroTik WEB.PROXY Recommendation

Always try NOT to use the same storage disk to store your your cache and your your Router OS, to ensure there is always enough space on your router OS Disk for logs, upgrade / update packages & Backups. Therefore It is highly recommended that the web-proxy cache is stored on a physically separate drive (store) other than the Router OS. Placing the cache on a separate drive ensures maximum performance and reduces problems if the disk becomes full or fails as the OS will then still be OK!
Caching Internet access will require a lot of read and writes to the disk, chose fast disk as for maximum performance / concurrent user request support.
Cache performance also largely depends on RAM size, the More RAM you have in your server, the Better performance you will get.
We will divide this article in 3 Sections.
1# Preparing Secondary Partition for Cache 
2# Configuring Web Proxy
3# Transparent Proxy
Let’s BEGIN . . .

1# Preparing Secondary Drive for CACHE

First we will Format secondary harddrive (to be used for cache ), IF YOU DON’T WANT TO USE SECONDARY HARD-DIVE, SKIP THIS STEP.
Goto SYSTEM > STORES > DISKS
Select the Secondary Hard drive and click on FORMAT DRIVE
As shown in the image below.


.
Now go to STORES tab (by navigating to  SYSTEM > STORES)
Select the WEB-Proxy package and click on COPY
It will ask you where to copy WEB-Proxy package, Select Secondary Drive in TObox.
As shown in the image below.


2# Configuring Web Proxy

Now We have to Enable Mikrotik Web Proxy by navigating to 
IP > WEB PROXY

As shown in the image below.

.
Now Click on “Enable”
in Port, Type 8080
Max Cache Size , Select Unlimited from drop down menu, OR if you have limited Disk Space, then use your desired amount.
You have to specify space in KiloBytes for example 1024 KB = 1MB , so if you want to set 5 GB Cache, then use 5242880 , I am using 5 GB in this example. The cache size is really based off of how much RAM you have in the machine
As shown in the image below . . .

.
Click on Apply and your Mikrotik’s Web Proxy is Ready to be used, But Every client have to set proxy address pointing to Mikrotik IP to be able to use Proxy Service.

3# Transparent Proxy

If we want that every user must be automatically redirected to Proxy transparently, then we have to create additional rule to forcefully redirect users to proxy service, which is called TRANSPARENT PROXY.
.
Goto IP > FIREWALL > NAT and create new rule
In Chain , Select dsntant,
In Protocol, Select 6 (tcp)
In Dst. Port, Type 80

As shown in the image below
 . . .


.
Now goto Action Tab,
In Action, Select redirct
In To Ports, Type 8080
As shown in the image below . . .

.
Now your newly created rule will look like something below image.
As shown in the image below
 . . .


OR the CLI version of above rule would be something like below.
1
/ip firewall nat add action=redirect chain=dstnat disabled=no dst-port=80 protocol=tcp to-ports=8080
Done. Now Mikrotik web proxy will perform as TRANSPARENT PROXY , Every user’s HTTP PORT 80 request will automatically be redirected to Mikrotik built-in Web Proxy.
You can View Proxy Status and other info via going to IP > WEB PROXY > SETTINGS > STATUS  and other tabs in the same window.
As shown in the image below . . .

=========================================
WEB-PROXY Tips ‘N’ Tricks !! by Zaib (December, 2011)
=========================================

.

Howto Send CACHED Contents to user at Full Speed / Ignoring QUEUE Limit for cached-hits marked packets :)

First Mark Cached Contents by MANGLE Rule.
1
2
3
/ip firewall mangle
add action=mark-packet chain=output comment="CACHE HIT/Zaib" disabled=no dscp=4 \
new-packet-mark=cache-hits passthrough=no
Now Create an Queue Tree which will send cache-hits packets to users at full LAN speed, ignoring the user’s Static OR Dynamic QUEUES
1
2
3
4
/queue tree
add burst-limit=0 burst-threshold=0 burst-time=0s disabled=no limit-at=0 \
max-limit=0 name="Unlimited Speed for CACHE by zaib" packet-mark=cache-hits \
parent=global-out priority=8 queue=default
Now Try to download any cacheable content , for example download following file,
http://www.rarlab.com/rar/wrar410b5a.exe
Once Downloaded, Try to download it again from any other computer or via same test pc. You will see the Queues and rules in action, sending cache-hits packets to users at full LAN speed.Remember Mikrotik web proxy is very basic and simple proxy server with not much tweaks and nuts ‘N’ Bolts  to set, So it will cache what it can. For advancements, Use SQUID instead.
As shows in the image below . . .

.
Also you can view the cache contents via going to IP > WEBPROXY > CACHE CONTENTS
As shows in the image below . . .

Howto Block Web Sites by Domain Name

You can block any web site via domain name as shown below.
1
2
/ip proxy access add action=deny disabled=no dst-host=yahoo.com
/ip proxy access add action=deny disabled=no dst-host=www.yahoo.com

Howto Block Downloading via File EXTENSION Types

You can block Downloading by file types using following code,
1
/ip proxy access add path=*.mp3 action=deny

Howto Block OPEN PROXY

Please Make sure You are not running your proxy in OPEN PROXY mode, If so any one cane use your proxy service over the internet, and can use perform any illegal activity and your proxy IP will be logged at remote server, So Block it immediately.
Use the following.
1
2
/ip firewall filter
add action=drop chain=input comment="Block Open PROXY <img src="http://s0.wp.com/wp-includes/images/smilies/icon_smile.gif?m=1129645325g" alt=":)" class="wp-smiley">  Zaib" disabled=no dst-port=8080 in-interface=wan protocol=tcp  src-address=0.0.0.0/0
In in-interface , select your WANinterface.

Howto Add LOGO and Edit Proxy Default ERROR Pages

Goto IP > WEB PROXY
Click on RESET HTML
It will ask you that “Current html pages will be lost ! Reset anyway?” CLick on YES
As shown in the image below . . .

,
Now goto FILES and you will see webproxy/error.html ,
As shown in the image below . . .

Just copy this error.html file to your desktop and edit it using your favorite html editor.
(I personally use MS FRONTPAGE 2003 due to its easy and user friendly interface, You can use notepad to edit this file content as its very small and contains basic text only. just don’t mess with the codes, only change the text you want, for example network name support numbers etc. after saving , upload it back to Mikrotiok under web-proxy section.)

Howto Block Web Site for Single User

To block any website for a single user , Use the following …
1
2
3
/ip proxy access
add action=deny comment="Block yahoo for single user" disabled=no dst-host=www.yahoo.com src-address=192.168.2.5
(192.168.2.5 is the user ip)
To block single user and redirect him to your policy page on any loacl web server defining the reason why he is blocked , use the following.
1
2
/ip proxy access
add action=deny comment="Block yahoo for single user" disabled=no dst-host=www.yahoo.com redirect-to=192.168.2.3/policy/deny.htm src-address=192.168.2.5
(192.168.2.3 is the web server ip , & 192.168.2.5 is the user ip)
As shown in the image below . . .

.
.
Howto Create HTTP File Sharing Server with Freeradius Backend + [Daloradius Frontend Optional]


Following is a complete guide on howto setup Apache to use FreeRadiusauthentication module along with DALORADIUS as a front-end. You can also use this guide to create full featured RADIUS server for your MIKROTIK or any other NAS which have external RADIUS authentication support in it.
Also this guide will illustrate you howto configure DALORADIUS. which is an advanced RADIUS web management application aimed at managing hotspots and general-purpose ISP deployments. It features user management, graphical reporting, accounting, a billing engine. It  is basically an nice GUI Frontend to control FREERADIUS. Using DR, you can create single/batch users, hotspot tickets, create plans n packages etc etc.
In the end I will show you howto create a APACHE base file sharing server which will use FREERADIUS for authentication :) 
Few months back , @ my friend’s cable.network , I installed  Mikrotik along with DMASOFTLAB RADIUS MANAGER which also uses FREERADIUS as backend authentication mechanism. They also had a 4 TB of windows IIS base FTP sharing server for Videos, Mp3, Games and etc for LAN users. All network was running on private ips, so setting authentication on sharing server so only valid users can access FTP was a headache, so for the time being I placed FTP server behind Mikrotik DMZ so that only pppoe dialer connected users can access them, BUTthis topology had a negative impact on overall Mikrotik performance because huge amount of (JUNK FTP) irrelevant traffic was going through the router which was increasing overall load on MT, so I decided to overcome this problem by changing the sharing server operating system from Microsoft Windows to UBUNTU Linux, and then I placed  it on users subnet and then link this sharing server [apache] authentication with freeradius. This way I managed to solve the problem. This guide will show you how I exactly did this.
Here we go . . .
We will divide this article in two categories.

1) FREERADIUS + MYSQL + DALORADIUS

2) How to authenticate Apache 2 with Radius
[Please note that I am using UBUNTU 10.4 and ip address is 192.168.2.1, all packages are installed in this single box for testing purpose,  you can separate them as per your requirements]
1) Installing FREERADIUS Server along with MYSQL+DALORADIUS :
I prefer installing the whole pre-requisite LAMP package (lamp-server stands for Linux-Apache-MySQL-PHP server). First We install lamp-server using the command below:
1
sudo tasksel install lamp-server
(you will need to enter root password, which is “123”  in my case , to continue the installation)
Now Install freeradius package
1
sudo apt-get install freeradius
Install freeradius ldap authentication
1
sudo apt-get install freeradius-ldap
Install freeradius to run with mysql
1
sudo apt-get install freeradius-mysql
After finishing the above installations, restart the FreeRADIUS service
1
sudo /etc/init.d/freeradius restart
If you are using Ubuntu, remove /commend the IPV6 entry from /etc/hosts
1
2
3
nano /etc/hosts
# The following lines are desirable for IPv6 capable hosts
# ::1     localhost ip6-localhost ip6-loopback
Now, you can test the Radius Server using radtest package, the command will be as below:
1
2
3
4
5
radtest radius 123 localhost 1812 123
(you will see its result something like below)
Sending Access-Request of id 198 to 127.0.0.1 port 1812
User-Name = "radius"  User-Password = "123" NAS-IP-Address = 127.0.1.1
NAS-Port = 1812 rad_recv: Access-Accept packet from host 127.0.0.1 port 1812, id=198, length=20
Which shows your RADIUS Server is in working condition. 
Now Download DALORADIUS which is hosted on sourceforge at the address of http://sourceforge.net/projects/daloradius/ and you may get the latest release from there ( I used 0.9.9) or use the wget command to download in any temp folder e.g /temp
1
2
3
4
5
6
7
mkdir /temp
cd /temp
tar -zxvf daloradius-0.9-9.tar.gz
mv daloradius-0.9-9.tar.gz daloradius
cp daloradius/ /var/www -R
chown www-data:www-data /var/www/daloradius -R chmod 644 /var/www/daloradius/library/daloradius.conf.php
MYSQL Database Setup
Now, we create the database for FreeRADIUS and an user account which will be used by FreeRADIUS to access into database. then import both freeradius and daloradius tables using this schema:
We will run the following command to Login MySQL Database
1
2
3
4
mysql -u root -p123
CREATE DATABASE radius;
grant all privileges on radius.* to 'radius'@'localhost';
quit
Now Import Daloradius mysql tables . . .
1
2
3
cd /var/www/daloradius/contrib/db/
mysql -u root -p radius < fr2-mysql-daloradius-and-freeradius.sql
mysql -u root -p radius < mysql-daloradius.sql
Database Connection SetupNow, simply adjust the MySQL database information in daloRADIUS’s config file.
1
2
3
4
5
cd /var/www/daloradius/library/
nano -w daloradius.conf.php
$configValues['FREERADIUS_VERSION'] = '2';
$configValues['CONFIG_DB_PASS'] = '123';
$configValues['CONFIG_DB_TBL_RADUSERGROUP'] = 'radusergroup';
Freeradius + mysql + daloradius Installation Complete.
Point your browser to

Login to the management:
1
2
username: administrator
password: radius
Here you can add users / plans etc etc. Please see daloraidus web site for more support info. Add some test users so that you test it later when apache ask authentication.You can also test this user with radtest.

1
radtest testuser testpassword localhost 1812 123

How to authenticate Apache 2 with RADIUS.

First we will install Apache radius module :
1
2
apt-get install libapache2-mod-auth-radius
a2enmod auth_radius
Now open /etc/apache2/apache2.conf and add the following lines to end of file,
1
2
AddRadiusAuth localhost:1812 123 5:3
AddRadiusCookieValid 1
Now For example we have mounted our 1 TB sharing Harddisk in /mnt/test and we want that if user try to open http://192.168.2.1/test in there browser , an Authentication Popup must appear to force user enter there valid radius user id password to further proceed, then Add the following lines in /etc/apache2/apache2.conf  in the end.
1
2
3
4
5
6
7
8
9
10
Alias /test /mnt/test
<Directory /mnt/test>
Options Indexes FollowSymlinks
AuthType Basic
AuthName "AA File Server Authentication"
AuthBasicAuthoritative Off
AuthBasicProvider radius
AuthRadiusAuthoritative on
AuthRadiusActive On
Require valid-user </Directory>


Now Point your browser to http://192.168.2.1/test and you will see authentication popup window , something like below image.
If the user supply wrong id password, he will see
If user enters valid id password, he will see the content of test folder.

Thursday, November 17, 2016

Отправляем сообщение на почту из Mikrotik Routerboard

В этой статье рассказывается о выполнении отправки сообщений на почту из Mikrotik Routerboard.

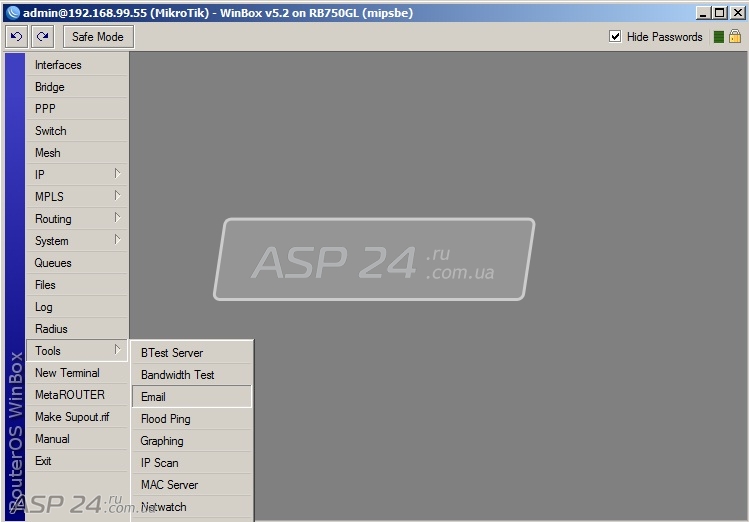
Mikrotik Routerboard/Tools Email
Рис.1. Mikrotik Routerboard /Tools Email.

Переходим в раздел /Tools Email.

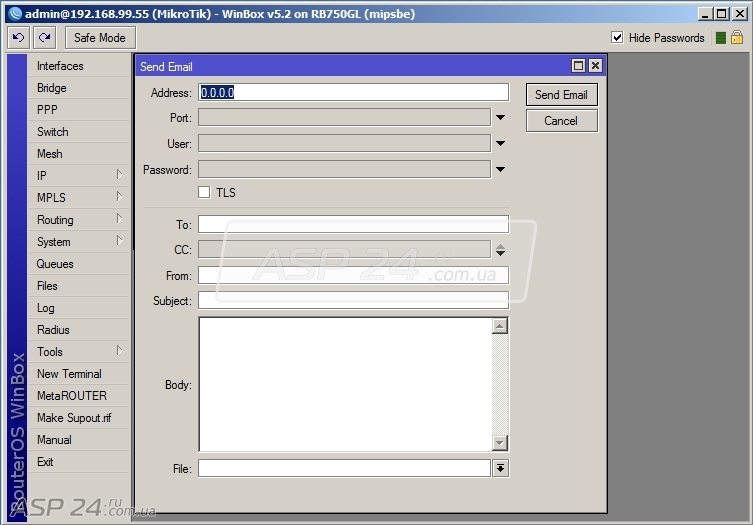
Mikrotik Routerboard Send Email
Рис.2. Mikrotik Routerboard Send Email.

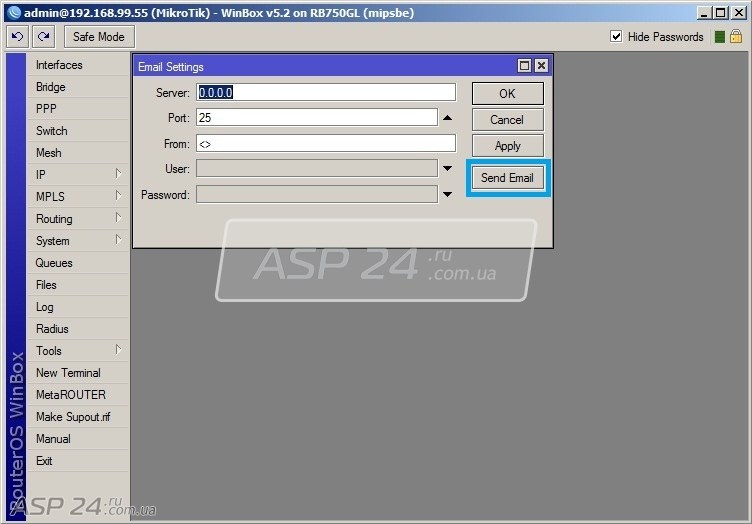
В появившемся окне нажимаем кнопку Send Email.

Mikrotik Routerboard, форма отправки
Рис.3. Mikrotik Routerboard, форма отправки.

В появившейся форме необходимо ввести данные для отправки.

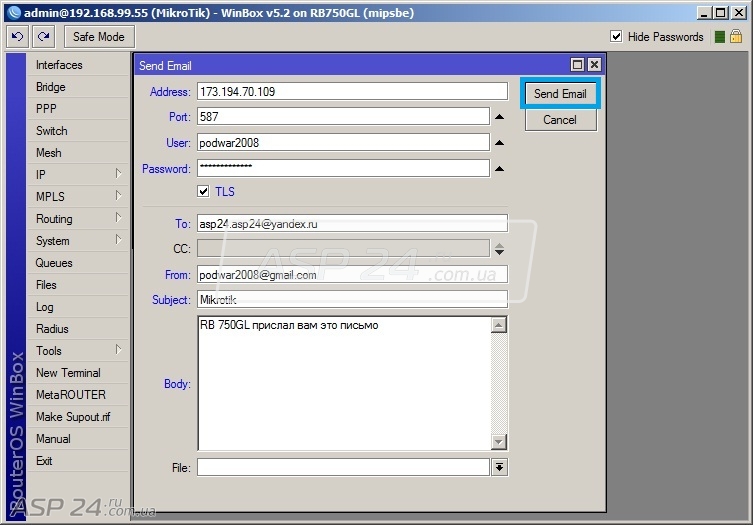
Mikrotik Routerboard, ввод данных
Рис.4. Mikrotik Routerboard, ввод данных.

В данном случае будем использовать почту gmail. В поле Address необходимо указать адрес SMTP-сервера gmail.
  • Port – порт SMTP-сервера gmail;
  • User – логин для доступа к почте gmail;
  • Password – пароль для доступа к почте gmail;
  • To – в этом поле указываем почтовый ящик получателя;
  • From - в этом поле указываем почтовый ящик отправителя;
  • Subject – тема письма;
  • Body – текст письма.

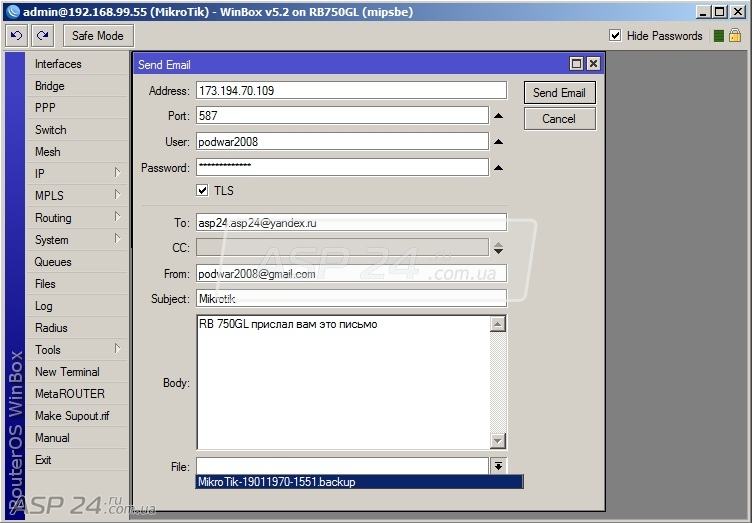
Mikrotik Routerboard, прикрепить файл
Рис.5. Mikrotik Routerboard, прикрепить файл.

При необходимости можно прикрепить файл к письму. После заполнения необходимых полей нажимаем кнопку Send Email.

MIkroTik RouterOS Email
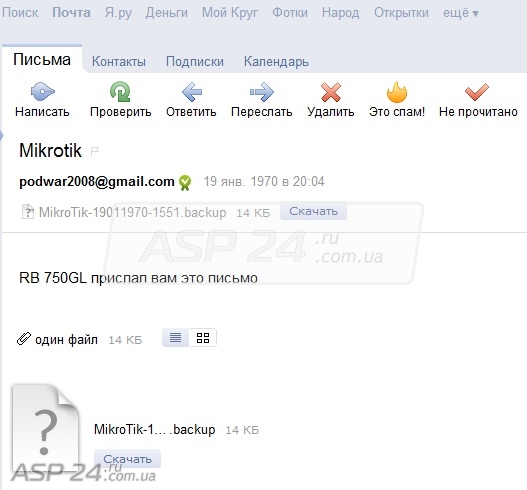
Рис.6. Письмо получено.

MIkroTik RouterOS Email
Рис.7. Содержание письма.

В полученном письме присутствуют все данные, которые мы указали.

MikroTik. Плюсы и минусы.

Mikrotīkls Ltd (торговая марка MikroTik) — латвийский производитель компьютерного сетевого оборудования. MikroTik разрабатывает, устанавливает и продает проводные и беспроводные маршрутизаторы, операционные системы к ним и сопутствующее оборудование. Компания была основана в 1995 году с целью продажи оборудования на развивающихся рынках. В 2007 году в компании работало более 70 сотрудников.
Можно разделить железо, которое называется RouterBoard и операционную систему, которая называется RouterOS. В разговорной речи, когда говорят об этом всём, говорят просто Mikrotik

Теперь перейдём к плюсам и минусам.
Какие плюсы есть у MikroTik:
  1. Стоимость — в своей ценновой категории конкурентов просто нет. 
  2. Функциональность — По сравнению с Dlink, TP-Link, Zyxell и прочими «домашними» роутерами функционал огромен. Сравнивать надо больше с Cisco, Juniper и прочим «взрослым» железом или с системами linux или freebsd (только сетевой стек). Перечислять не вижу смысла, но могу заметить, что можно реализовать практически любую «хотелку» в сетевых технологиях.
  3. Надёжность и стабильность — если микротик настроен и протестирован он будет работать ОЧЕНЬ долго и безпроблемно. Также очень спасают встроенный скриптовый язык (с помощью которого можно настроить всевозможные действия на проблемы) и технология WatchDog которая спасает при зависшем роутере. Все проблемы какие у меня были, возникали из-за проблем с питанием (очень много и часто грозы). При наличии хорошего заземления и ИБП проблем практически нет. Хотя периодически на форумах и слышу про баги и браки, но сам ни разу не сталкивался (если не считать свои кривые руки багом).
  4.  Документация и обновления — есть вполне подробная официальная википедия. Все прошивки лежат прямо на сайте, доступные для скачивания даже без авторизации. В отличии от той же Cisco где простое обновление получить иногда проблема (требуется статус сертифицированного специалиста или вообще говорят, что это только для тех.поддержки)
  5.  Единая ОС и система конфигурации — так как везде используется RouterOS это позволяет и быстро менять оборудование, востанавливать на новое железо или просто передавать-советовать другим как и что сделать.
  6.  Масштабируемость — Есть предложения практически для каждого сегмента малого и среднего бизнеса (для крупного я бы не рекомендовал). Причём если вам не хватает к примеру какого-нибудь из Core-серии, всегда можно развернуть RouterOS на мощном x86 сервере с нужной производительностью.
А теперь можно перейти к минусам:
  1. Если вам требуется реально бесперебойная работа, то микротик вам вряд ли подойдёт. Но это уже железо совсем другого уровня (несколько блоков питания, резервирование всего и вся, и прочие радости жизни). Однако есть примеры внедрения на RouterOS на нескольких х86 серверов + VMware Fault Tolerance, да и VRRP не зря придумали.
  2. Если вам требуется маршрутизировать более 10G трафика ежесекундно (да есть Core-серия, но будем откровенны — на ней тоже не всё гладко).
  3. Когда вам требуется шифрование по ГОСТу, или у вас динамическая маршрутизация на EIGRP, или и прочие радости Vendor Lock.
  4. Если вы не разбираетесь в сетях — конечно настроить по куче мануалов из сети не очень сложно, но для обычного пользователя достаточно трудоёмкий процесс.
  5. Если вы являетесь продавцом железа — предположим, что вы закладываете наценку в 20%. Тогда вам выгоднее продать ту же CISCO, чем Mikrotik. Так как CISCO дороже и соответственно принесёт вам большую прибыль.
  6. Если вам нужно устройство «всё-в-одном» — NAS, торренто-качалка, DLNA, кофеварка и всё другое то вряд ли вам подойдёт Mikrotik. Это именно роутер (хотя через встроенные средства виртуализации и можно реализовать, но работать это будет не очень стабильно).
  7. Если вы Ричард Столман или трепетно относитесь к GPL. Потому что да. Нарушают. RouterOS основана на Linux, но что было изменено и как никто не знает.
  8. Отсутствует «корпоративная» техподдержка и гарантии — здесь нет чтобы вам в течении 2 часов заменили железку на новую. Или удалённо подключившись настроили что-либо. Либо разбираться самому, либо платить фрилансерам. Вообще поддержка есть и если вам не требуется “здесь и сейчас”, то вполне возможно вам она подойдёт.
  9. Малое распространение марки — это достаточно существенный минус. И он как для потребителей, так и для специалистов. Так как RouterOS слабо распространен, то и спрос на специалистов разбирающихся в ней мал. Так и для фирм — если у вас сеть построена на данной ОС и затем ваш системный администратор ушел, вам будет сложнее найти специалиста который бы разбирался в данном вопросе. Да и вдалеке от крупных городов найти роутеры Mikrotik подчас достаточно большая проблема